In my last post, I explained what Biml is, how to get it, and the benefits of using Biml. I also provided a learning plan for getting started. I’ve reposted steps 1 – 3 from the learning plan below. I will cover these items in this post and the remaining items in a future post.
- Create a blank package in Biml and generate it using BIDS Helper
- Create a project level connection in Biml and generate it using BIDS Helper
- Create a package to populate a staging table in Biml with BIDS Helper that simply truncates a table and then selects data from a single table in another database and inserts it into the newly truncated table.
1. Create a Blank Package
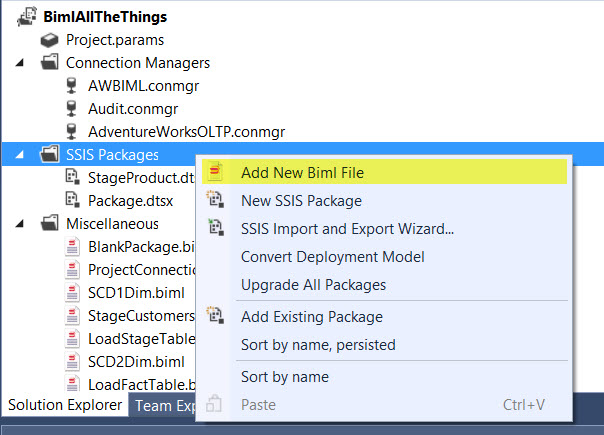
Create or open a new SSIS project in SQL Server Data Tools. Right click on the SSIS Packages folder and choose Add New Biml File.
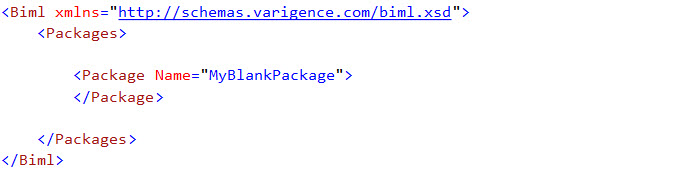
The new Biml file will be created in the Miscellaneous folder. It will contain two lines of text. This is your Biml declaration or root element. The Biml you write goes in between the Biml open and close tag.
 Biml is made up of collections and child items. To create a package we must first add a Packages collection and then a Package child item. The child items can have many attributes. Check out the documentation on Varigence.com to see the list of attributes for packages.
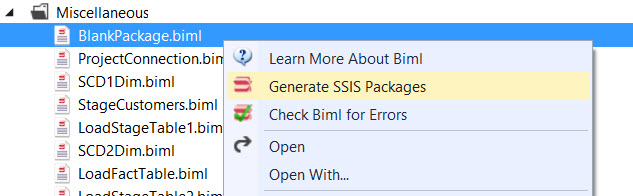
These six lines of code give us a buildable package. We can now right-click on the Biml file and choose Generate SSIS Package.
You will see a new package appear in the packages list in your project. If you open the package it will be completely blank since we didn’t add any tasks.
2. Create a Project Connection Manager
The other element you will need for most packages is a connection. I like to keep my project connections in a separate file from my package declarations so I can reference the connections from multiple package declarations and I only have to update one place when I need to change them. For learning purposes, you can put them in the same file with your package or in a separate file. Just make sure the connections are created before creating the package that uses them. Try to create a few connections that cover the types you most commonly use. I created an OLEDB connection to a SQL Server database on my local machine for demonstration purposes.
 <Connections>
     <OleDbConnection Name="OLEDBAdventureWorks"
     ConnectionString =
     "Data Source=mlongoria-work\SQL2014;Initial Catalog=AW2014;Integrated Security=SSPI;Provider=SQLNCLI11.1;"
     CreateInProject="true"/>
 </Connections>
First, I created the Connections Collection. Then I created an OleDbConnection child item. The Name and ConnectionString attributes should look familiar from creating SSIS packages by hand. The CreateInProject attribute specifies whether the Connection should be created as a ConnectionManager within each SSIS package that uses it or as a shared ConnectionManager for each project that uses it. Here’s my full Biml file with a connection and a package that uses it.
<Biml xmlns="http://schemas.varigence.com/biml.xsd">

     <Connections>
     <OleDbConnection Name="OLEDBAdventureWorks"
     ConnectionString =
     "Data Source=mlongoria-work\SQL2014;Initial Catalog=AW2014;Integrated Security=SSPI;Provider=SQLNCLI11.1;"
     CreateInProject="true"/>
     </Connections>

     <Packages>
          <Package Name="MyFirstPackage" ConstraintMode="Linear" ProtectionLevel="DontSaveSensitive">
               <Tasks>
                    <ExecuteSQL Name="TestSQL" ConnectionName="OLEDBAdventureWorks">
                         <DirectInput>Select top 1 * from Person.Person</DirectInput>
                    </ExecuteSQL>
               </Tasks>
          </Package>
     </Packages>

 </Biml>
You can right-click on the Biml file and choose Check Biml for Errors to make sure the syntax is right, all required attributes are present, and data connections are able to connect. When you generate the packages from the Biml file you will create the connection manager and a package with an Execute SQL Task that runs a simple select statement.
3. Create a Staging (Truncate & Reload) Package
Now that you have the basics, it’s time to make a package that does something useful. The Biml below creates the package and connections to truncate the target table and then select data from the source table and insert it into the target table. This a simplified version with no auditing or error handling outside of what is built in to SSIS, but it helps you create a useful package.
 <Biml xmlns="http://schemas.varigence.com/biml.xsd">

 <Connections>
     <OleDbConnection Name="AdventureWorksOLTP"
     ConnectionString =
     "Data Source=mlongoria-work\SQL2014;Initial Catalog=AW2014;Integrated Security=SSPI;Provider=SQLNCLI11.1;"
     CreateInProject="true"/>
     <OleDbConnection Name="AWBIML"
     ConnectionString =
     "Data Source=mlongoria-work\SQL2014;Initial Catalog=AWBIML;Integrated Security=SSPI;Provider=SQLNCLI11.1;"
     CreateInProject="true"/>
 </Connections>

 <Packages>
     <Package Name="StageProduct" ConstraintMode="Linear" ProtectionLevel="DontSaveSensitive">
          <Variables>
               <Variable Name="SchemaName" DataType="String" Namespace="User">Staging</Variable>
               <Variable Name="TableName" DataType="String" Namespace="User">Product</Variable>
               <Variable Name="QualifiedTableSchema" DataType="String" EvaluateAsExpression="true"
                    Namespace="User">"[" + @[User::SchemaName] + "].[" + @[User::TableName] + "]"</Variable>
               <Variable Name="TruncateTableStatement" DataType="String" Namespace="User"
                    EvaluateAsExpression="true">"Truncate table " + @[User::QualifiedTableSchema]</Variable>
          </Variables>
          <Tasks>
               <ExecuteSQL Name="Truncate Staging Table" ConnectionName="AWBIML">
                     <VariableInput VariableName="User.TruncateTableStatement"></VariableInput>
               </ExecuteSQL>
               <Dataflow Name="PopulateStageProduct">
                     <Transformations>
                          <OleDbSource Name="AdventureWorksProduct" ConnectionName="AdventureWorksOLTP" >
                               <DirectInput>
                                    SELECT [ProductID]
                                    ,[Name]
                                    ,[ProductNumber]
                                    ,[MakeFlag]
                                    ,[FinishedGoodsFlag]
                                    ,[Color]
                                    ,[SafetyStockLevel]
                                    ,[ReorderPoint]
                                    ,[StandardCost]
                                    ,[ListPrice]
                                    ,[Size]
                                    ,[SizeUnitMeasureCode]
                                    ,[WeightUnitMeasureCode]
                                    ,[Weight]
                                    ,[DaysToManufacture]
                                    ,[ProductLine]
                                    ,[Class]
                                    ,[Style]
                                    ,[ProductSubcategoryID]
                                    ,[ProductModelID]
                                    ,[SellStartDate]
                                    ,[SellEndDate]
                                    ,[DiscontinuedDate]
                                    ,[rowguid]
                                    ,[ModifiedDate]
                                    FROM [AdventureWorks2014].[Production].[Product]
                               </DirectInput>
                          </OleDbSource>
                          <OleDbDestination Name="StageProduct" ConnectionName="AWBIML">
                               <ExternalTableOutput Table="Staging.Product"></ExternalTableOutput>
                          </OleDbDestination>
                     </Transformations>
                </Dataflow>
           </Tasks>
      </Package>
 </Packages>

</Biml>
What we have learned so far gets us out of clicking and dragging to make our packages. The Biml may be faster to create than an SSIS package. It is (in my opinion) quicker and easier to copy and modify. But the magic happens later when we add BimlScript. I’ll cover that in a future post. For now, we must learn to walk before we can run.